Time:2025-02-25 Views:0
Introduction
The washroom vanity is a central and multifunctional element in any bathroom. It serves as a storage solution for toiletries, towels, and other essentials, while also providing a surface for daily grooming activities. Beyond its practical uses, the washroom vanity significantly contributes to the overall aesthetic of the bathroom, setting the tone for the entire space. Whether you're planning a fullscale bathroom renovation or a simple upgrade, choosing the right washroom vanity is crucial. In this comprehensive guide, we'll explore various aspects of washroom vanities, including their types, materials, styles, installation, and maintenance.
Types of Washroom Vanities
Freestanding Vanities
Freestanding vanities are one of the most common types. They are selfcontained units that can be placed anywhere in the bathroom, offering flexibility in terms of placement. These vanities come in a wide range of sizes, from compact models suitable for small bathrooms to large, elaborate designs for spacious master bathrooms.
A typical freestanding vanity consists of a cabinet base, which may have drawers, doors, or a combination of both for storage. On top of the cabinet is a countertop, often made of materials like granite, marble, quartz, or engineered stone. The countertop usually has a predrilled hole for the sink, which can be an undermount, dropin, or vessel sink. Freestanding vanities can be made of various materials, with wood being a popular choice for a classic and warm look. However, they can also be crafted from metal, laminate, or a combination of materials to achieve different styles.
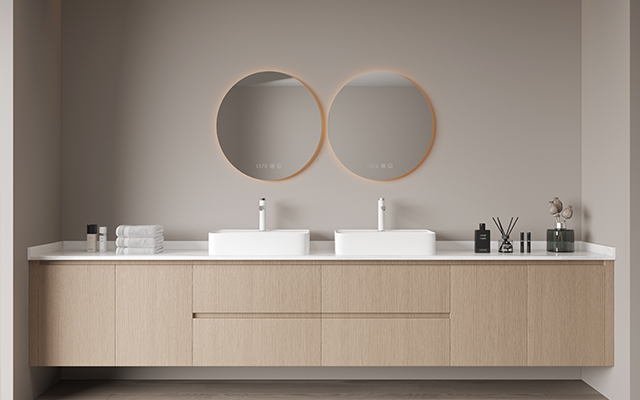
WallMounted Vanities
Wallmounted vanities, also known as floating vanities, are attached directly to the wall, giving the illusion of more space in the bathroom. This type of vanity is especially beneficial for small bathrooms as it creates a sense of openness by freeing up floor space. Wallmounted vanities can be either a simple, sleek design with a minimalistic cabinet or a more elaborate one with multiple drawers and compartments.
The installation of wallmounted vanities requires proper support from the wall, usually by securing the vanity to wall studs. They are available in different materials, with modern designs often featuring a combination of woodlook finishes, glass, and metal accents. The countertop options for wallmounted vanities are similar to those of freestanding vanities, and the choice of sink can also vary, with undermount sinks being a popular choice for a seamless look.
Corner Vanities
Corner vanities are designed to fit snugly into the corners of a bathroom, making excellent use of otherwise underutilized space. These vanities are ideal for bathrooms with an irregular layout or limited square footage. Corner vanities can be freestanding or wallmounted, and their shape is typically triangular or Lshaped to maximize corner space.
The interior of corner vanities can be configured in various ways. Some may have a combination of shelves and drawers, while others may feature a single large cabinet for storing bulkier items. The countertop of a corner vanity also follows the triangular or Lshaped design, and it can accommodate a cornerspecific sink or a more standardshaped sink depending on the design. Materials used for corner vanities are diverse, allowing for a wide range of style options, from traditional to contemporary.
Pedestal Sink Vanities
Pedestal sink vanities are a unique type that combines the functionality of a vanity with the elegance of a pedestal sink. Instead of a traditional cabinet base, a pedestal sink vanity has a pedestal that supports the sink and provides a small amount of storage space. The pedestal can be a simple, cylindrical design or a more ornate, decorative one.
Pedestal sink vanities are often chosen for their spacesaving qualities and their ability to add a touch of classic charm to a bathroom. They are wellsuited for powder rooms or small bathrooms where space is at a premium. While the storage capacity of pedestal sink vanities is limited compared to other types, they can still be used to store a few essential toiletries. The sink itself can be made of porcelain, ceramic, or other materials, and the pedestal is usually crafted from a matching or complementary material.
Materials Used in Washroom Vanities
Wood
Wood is a classic and popular material for washroom vanities. Different types of wood offer distinct characteristics. Oak, for example, is known for its durability and strength, with a prominent grain pattern that adds a natural and rustic charm. Maple has a smooth, lightcolored appearance, making it suitable for modern and contemporary designs. Cherry wood provides a rich, warm color that darkens over time, giving the vanity an elegant and sophisticated look.
Wooden vanities can be finished in various ways. Staining the wood can enhance its natural grain, while painting can transform the look to match any color scheme. However, wood is susceptible to moisture damage, so proper sealing and maintenance are essential. Vanities made from solid wood are generally more expensive, but there are also options like plywood or MDF (MediumDensity Fiberboard) with a wood veneer finish that offer a more affordable alternative while still maintaining a woodlike appearance.
Metal
Metal is increasingly being used in washroom vanity designs, especially in modern and industrialstyle bathrooms. Stainless steel is a popular choice due to its corrosionresistance, strength, and sleek, contemporary look. It can be used for the frame of the vanity, the legs, or even as decorative accents. Aluminum is another lightweight yet durable metal option, often used in combination with other materials.
Metalbased vanities can be paired with different types of countertops, such as glass, stone, or wood, to create a unique and stylish look. For example, a stainlesssteelframed vanity with a glass countertop can give a very modern and minimalist aesthetic. Metal vanities are also relatively easy to clean and maintain, making them a practical choice for busy bathrooms.
Laminate
Laminate is a costeffective material that is widely used in washroom vanities. It consists of multiple layers of materials, including a printed paper layer that mimics the look of various surfaces, such as wood, stone, or fabric, bonded to a core material. Laminate vanities are available in a vast array of colors and patterns, allowing for a high degree of customization.
One of the advantages of laminate is its resistance to stains, scratches, and moisture to a certain extent. It is also relatively easy to clean, requiring only a damp cloth and mild detergent. Laminate vanities are often more affordable than those made from natural materials like wood or stone, making them a popular choice for budgetconscious consumers. However, they may not have the same durability or highend look as some other materials.
Stone
Stone materials, such as granite, marble, and quartz, are highly soughtafter for washroom vanity countertops. Granite is a natural stone known for its durability and heat resistance. It has a unique, speckled appearance with a wide range of colors and patterns, depending on the quarry it is sourced from. Marble, on the other hand, is prized for its elegance and smooth, veined appearance. It gives a luxurious and classic look to the vanity.
Quartz is an engineered stone that combines natural quartz crystals with resin binders. It offers a consistent color and pattern, is highly resistant to stains, scratches, and heat, and requires less maintenance compared to natural stones. Stone countertops can be paired with vanities made from various materials, such as wood, metal, or laminate. However, stone is a relatively heavy material, and proper installation support is crucial.
Styles of Washroom Vanities
Traditional Styles
Traditional washroom vanities often feature classic design elements. They are typically made of wood, such as oak or cherry, with detailed carvings, raisedpanel doors, and decorative moldings. The hardware used on traditional vanities, such as handles and knobs, is often in a traditional style, like brass or bronze with an antique finish.
The countertops of traditional vanities may be made of natural stone, such as marble or granite, adding to the luxurious and timeless look. Traditional vanities are wellsuited for bathrooms with a classic or traditional decor theme, and they can create a sense of elegance and sophistication. They often have a more substantial and solid appearance, which can make a statement in the bathroom.
Modern Styles
Modern washroom vanities are characterized by sleek lines, minimalistic designs, and the use of contemporary materials. They often feature flatpanel doors, handleless designs, or simple, geometricshaped handles. Materials like metal, glass, and highgloss laminates are commonly used in modern vanity designs.
The countertops of modern vanities can be made of materials such as quartz, glass, or concrete, which add to the modern aesthetic. Wallmounted modern vanities are popular, as they contribute to the sense of openness and simplicity. Modern vanities are ideal for bathrooms with a contemporary or minimalist decor, and they can create a clean, uncluttered look.
Contemporary Styles
Contemporary washroom vanities blend elements of modern and traditional styles, along with current design trends. They are more flexible in terms of design, allowing for a combination of different materials, colors, and textures. Contemporary vanities may feature a mix of wood and metal, or they could have a unique, asymmetrical design.
The use of bold colors, unique lighting features, and innovative storage solutions is also common in contemporary vanity designs. For example, a contemporary vanity might have a brightly colored cabinet with a contrasting stone countertop. Contemporary vanities are suitable for bathrooms where you want to create a unique and uptodate look, and they can adapt well to various personal tastes.
Rustic Styles
Rustic washroom vanities evoke a sense of warmth and coziness. They are often made of reclaimed or distressed wood, which gives them a wornin, natural look. The wood may have visible knots, cracks, or rough textures, adding to the rustic charm. Rustic vanities may also feature metal accents, such as wroughtiron handles or hinges.
The countertops of rustic vanities can be made of natural stone, such as slate or soapstone, or they could be a simple, wooden slab. Rustic vanities are perfect for bathrooms with a farmhouse, cottage, or rusticthemed decor. They can create a relaxing and inviting atmosphere in the bathroom.
Installation of Washroom Vanities
Planning the Installation
Before starting the installation of a washroom vanity, careful planning is essential. First, measure the available space in the bathroom accurately. Measure the length, width, and height of the area where the vanity will be installed. Take into account any obstacles, such as pipes, electrical outlets, or windows. Mark the location of these obstacles on the floor and walls.
Determine the type of vanity you want to install and make sure it will fit in the designated space. Consider the plumbing and electrical requirements. If you're installing a new sink, you'll need to connect the water supply lines and the drain. If the vanity has any electrical components, such as a lighted mirror or a builtin outlet, you'll need to plan for proper electrical wiring.
Tools Required
To install a washroom vanity, you'll need a variety of tools. Some of the essential tools include a drill, a screwdriver (both manual and electric), a level, a tape measure, a hacksaw (if you need to cut pipes), a plumber's wrench, and a caulking gun. You may also need shims to level the vanity, screws, and nails. If you're installing a wallmounted vanity, you'll need wall anchors and a stud finder to ensure proper support.
Installation Process
1. Preparing the Space
Clear the area where the vanity will be installed of any existing fixtures, debris, or obstacles. If you're replacing an old vanity, carefully remove it, disconnecting the plumbing and electrical connections first. Make sure to turn off the water supply before working on the plumbing.
If the floor or wall is uneven, you may need to level it. For the floor, you can use selfleveling compound or shims. For the wall, use a level and shims to make it flat. This is important to ensure that the vanity is installed straight and securely.
2. Installing the Plumbing
If you're installing a new sink, start by installing the faucet. Follow the manufacturer's instructions to attach the faucet to the sink. Then, connect the water supply lines to the faucet. Make sure to use the appropriate fittings and sealants to prevent leaks.
Next, install the drain. Insert the drain assembly into the sink and secure it in place. Connect the drain pipe to the main drain line. Test the plumbing by turning on the water supply and checking for any leaks.
3. Installing the Vanity
For a freestanding vanity, place it in the desired location. Use a level to ensure that it is straight and level. If it's not, adjust it using shims. Secure the vanity to the floor using screws or brackets, if necessary.
For a wallmounted vanity, first mark the location of the wall studs on the wall. Use a stud finder to locate the studs accurately. Hang the vanity on the wall, making sure it is level. Secure the vanity to the wall studs using screws or wall anchors.
4. Installing the Countertop
If the vanity comes with a separate countertop, carefully lift it into place and set it on top of the vanity. Make sure it is centered and aligned properly. Secure the countertop to the vanity using the provided hardware or adhesive.
If the sink is not already installed in the countertop, carefully place the sink in the predrilled hole. For an undermount sink, use clips or adhesive to attach it to the bottom of the countertop. For a dropin or vessel sink, simply place it in the appropriate position.
5. Finishing Touches
Apply a bead of caulk around the edges of the countertop where it meets the wall and the sink. This will help to seal the gaps and prevent water from seeping in.
Install the handles, knobs, and any other hardware on the vanity doors and drawers.
Finally, test the vanity again to make sure all the plumbing and electrical components are working properly.
Maintenance of Washroom Vanities
Cleaning
Regular cleaning is essential to keep your washroom vanity looking its best. Use a soft, damp cloth to clean the surface of the vanity, including the cabinet, countertop, and sink. For the countertop, if it's made of stone, use a mild stone cleaner recommended by the manufacturer. Avoid using abrasive cleaners or scrubbers as they can scratch the surface.
For the cabinet, if it's made of wood, use a wood cleaner and polish to keep it looking shiny and to protect the wood. If it's a laminate or metal cabinet, a simple household cleaner and a soft cloth will usually do the job. For the sink, depending on the material, use an appropriate cleaner. Porcelain or ceramic sinks can be cleaned with a mild detergent, while stainlesssteel sinks may require a stainlesssteel cleaner to maintain their shine.
Checking for Damage
Regularly check the vanity for any signs of damage. Look for loose screws, hinges that are not working properly, or any cracks or chips in the countertop, sink, or cabinet. If you notice any loose screws, tighten them using a screwdriver. If a hinge is not working smoothly, you may need to lubricate it with a siliconebased lubricant.
For cracks or chips in the countertop or sink, depending on the severity, you may be able to repair them using a suitable filler or epoxy. For wooden cabinets, if you notice any signs of water damage, such as warping or swelling, address the source of the moisture and consider refinishing or replacing the affected parts.
Organizing the Storage
To keep your washroom vanity functioning efficiently, it's important to organize the storage space. Use storage bins, baskets, or dividers to keep your toiletries, towels, and other items in order. Group similar items together, such as hair products, skincare products, and cleaning supplies.
Regularly declutter the vanity by getting rid of items that you no longer use or that have expired. This will not only make it easier to find what you need but also keep the vanity looking neat and tidy. Consider using drawer organizers for smaller items like toothbrushes, combs, and makeup brushes to keep them organized and easily accessible.
Conclusion
The washroom vanity is a key element in any bathroom, combining functionality with style. With a wide range of types, materials, styles, and installation options available, there is a washroom vanity to suit every bathroom size, decor theme, and budget. By carefully considering your needs, preferences, and the available space, and by following proper installation and maintenance procedures, you can select and install a washroom vanity that will enhance the beauty and functionality of your bathroom for years to come. Whether you opt for a classic, traditional vanity or a sleek, modern design, the right washroom vanity can transform your bathroom into a more comfortable and inviting space.
Floating TV Stands: A Stylish and Functional Choice for Your Home Entertainment Setup
Introduction
In the realm of modern home decor and entertainment, the floating TV stand has emerged as a popular and versatile piece of furniture. It serves not only as a practical platform for your television but also as a design element that can enhance the overall aesthetic of your living room, bedroom, or any other space where you enjoy your favorite shows, movies, and games. This article will explore the various aspects of floating TV stands, including their design features, functionality, installation process, and how they can be incorporated into different interior design styles.
Design Features
Sleek and Minimalist Aesthetic
One of the most striking features of floating TV stands is their sleek and minimalist appearance. Unlike traditional TV stands that rest on the floor with visible legs or supports, floating TV stands seem to hover on the wall, creating a clean and uncluttered look. This minimalist design is highly appealing in contemporary and modernstyle interiors, where simplicity and a sense of open space are highly valued. The absence of bulky legs or a large base allows the focus to remain on the television and any decorative elements placed on the stand, such as media players, soundbars, or decorative objects.
Customizable Shelving and Storage
Floating TV stands often come with customizable shelving options. You can choose stands with multiple shelves of different sizes, allowing you to store a variety of items. For example, the lower shelves can be used to house media consoles like gaming consoles, Bluray players, and cable boxes. The middle shelves can be dedicated to storing DVDs, books, or small decorative items, while the upper shelves can be used to display framed photos or collectibles. Some floating TV stands even have adjustable shelves, enabling you to change the height according to the size of your media devices or the items you want to store.
In addition to open shelving, many floating TV stands also offer enclosed storage options, such as drawers or cabinets. Drawers are great for storing smaller items like remote controls, cables, and batteries, keeping them out of sight but easily accessible. Cabinets, on the other hand, can be used to store bulkier items or items that you want to keep hidden, such as extra cables, chargers, or unsightly media devices.
Material Diversity
Floating TV stands are available in a wide range of materials, each with its own unique characteristics and aesthetic appeal. Wood is a popular choice, offering a warm and natural look. Solid wood floating TV stands, such as those made from oak, walnut, or maple, exude a sense of quality and durability. They can be stained or painted to match the color scheme of your room. Plywood and MDF (MediumDensity Fiberboard) are also commonly used in the construction of floating TV stands. These materials are more affordable than solid wood and can be easily shaped and finished to mimic the look of real wood.
Metal is another material used in floating TV stand design, especially in modern and industrialstyle pieces. Metalframed floating TV stands with glass or wooden shelves can add a touch of sophistication and contemporary style to a room. The combination of metal and glass creates a sleek and modern look, while the addition of wood can bring in a sense of warmth and texture.
Functionality
SpaceSaving Solution
For those living in small apartments or rooms with limited space, a floating TV stand is an excellent spacesaving solution. Since it is mounted on the wall, it doesn't take up any floor space, which can be a significant advantage in rooms where every square foot counts. This allows you to arrange your furniture more freely and create a more open and spacious feel in the room. You can place seating closer to the TV without having to worry about maneuvering around a large, bulky TV stand.
Cable Management
Managing the tangle of cables associated with modern media devices can be a challenge. Many floating TV stands are designed with builtin cable management systems. These systems typically include holes or channels in the back of the stand or through the shelves, allowing you to route cables neatly and keep them out of sight. This not only improves the appearance of your entertainment setup but also helps to prevent cables from getting tangled, reducing the risk of damage to the cables and your media devices.
Height Adjustability (in some models)
Some floating TV stands offer heightadjustability features. This can be particularly useful if you want to optimize the viewing angle of your television. Whether you're sitting on a couch, a chair, or even on the floor, you can adjust the height of the TV stand to ensure that you have a comfortable and ergonomic viewing experience. Heightadjustable floating TV stands are also beneficial for those who use their TV for activities other than just watching shows, such as gaming or using a computer monitor with the TV.
Installation Process
Preparation
Before installing a floating TV stand, it's important to prepare the wall and gather the necessary tools. First, you need to ensure that the wall is suitable for mounting. A solid wall, such as a brick, concrete, or a studframed wall, is ideal. If you're not sure what type of wall you have, you can use a stud finder to locate the studs in the wall. You'll also need a drill, screws, wall anchors (if necessary), a level, a measuring tape, and any other tools specified in the installation instructions that come with the TV stand.
Mounting the Brackets
The first step in the installation process is usually to mount the brackets on the wall. The brackets are the support structure that will hold the floating TV stand. Use the measuring tape to mark the position on the wall where you want to install the brackets. Make sure the marks are level using a level. Drill holes in the wall at the marked positions and insert the screws or wall anchors, depending on the type of wall and the brackets provided. Once the brackets are securely mounted on the wall, you can move on to the next step.
Attaching the TV Stand to the Brackets
After the brackets are in place, carefully lift the floating TV stand and attach it to the brackets. This may involve aligning holes in the stand with the screws on the brackets and tightening them using a screwdriver or a wrench. Some TV stands may have a locking mechanism to ensure that the stand is securely attached to the brackets. Make sure to follow the installation instructions carefully to ensure a proper and secure installation.
Checking for Stability
Once the TV stand is attached to the brackets, it's important to check for stability. Gently shake the stand to make sure it is firmly attached to the wall and does not wobble. If the stand seems unstable, doublecheck the installation of the brackets and the attachment of the stand to the brackets. You may need to tighten the screws or make adjustments to ensure that the stand is stable and safe to use.
Incorporating into Different Interior Design Styles
Modern and Contemporary Interiors
In modern and contemporary interiors, floating TV stands with a sleek, minimalist design and a combination of materials like glass, metal, and lightcolored wood or highgloss finishes fit in perfectly. A floating TV stand with a white or black highgloss finish, paired with a glasstopped shelf and a metal frame, can create a sophisticated and stylish look. You can accessorize the stand with modernstyle media devices, a minimalist soundbar, and a few simple decorative objects, such as a geometricshaped vase or a contemporary art piece.
Scandinavian Style
Scandinavianstyle interiors are known for their simplicity, lightfilled spaces, and natural materials. A floating TV stand made from lightcolored wood, such as pine or birch, with a natural finish, would be a great addition to a Scandinavianstyle living room. The stand can be paired with white walls, lightcolored furniture, and soft, naturalfiber textiles. You can decorate the stand with greenery, such as a small potted plant, and a few wooden or ceramic decorative items to add a touch of warmth and texture.
Industrial Style
For an industrialstyle interior, a floating TV stand with a metal frame and a distressed or reclaimed wood shelf would be a perfect choice. The metal frame can have a raw, unfinished look, while the wood shelf can add a touch of warmth and character. You can place industrialstyle media devices, such as a retrolooking turntable or a vintageinspired radio, on the stand. Add some exposed light bulbs or industrialstyle pendant lights above the stand to enhance the overall industrial aesthetic.
Maintenance and Care
Cleaning
Cleaning a floating TV stand is relatively easy. For wooden stands, you can use a soft, damp cloth to wipe away dust and dirt. Avoid using harsh chemicals or abrasive cleaners, as they can damage the finish of the wood. If there are stubborn stains, you can use a mild wood cleaner, following the manufacturer's instructions. For metalframed stands, a dry cloth can be used to remove dust, and a mild metal cleaner can be used for more thorough cleaning. Glass shelves can be cleaned with a glass cleaner and a soft cloth to keep them looking clear and streakfree.
Avoiding Overloading
To ensure the longevity and stability of your floating TV stand, it's important to avoid overloading it. Check the weight capacity specified by the manufacturer and make sure not to place more weight on the stand than it can handle. Overloading the stand can cause it to become unstable, and in extreme cases, it can even cause the stand to detach from the wall.
Checking for Wear and Tear
Regularly check the floating TV stand for any signs of wear and tear. Look for loose screws, cracks in the material, or any other signs of damage. If you notice any issues, address them promptly. Tighten loose screws, and if there are any cracks or significant damage, consider repairing or replacing the affected parts to ensure the continued safety and functionality of the stand.
Floating TV stands offer a winning combination of style, functionality, and spacesaving design. Their sleek appearance, customizable storage options, and ability to enhance different interior design styles make them a popular choice for homeowners. With proper installation, maintenance, and careful consideration of how they fit into your home's decor, a floating TV stand can be a longlasting and valuable addition to your home entertainment setup. Whether you're looking to update your living room, create a cozy entertainment nook in your bedroom, or make the most of limited space in a small apartment, a floating TV stand is definitely worth considering.


 CN
CN